It takes a lot of effort to go out in the Cold when you could just stay in the house and have a Christmas drink...
But I did postpone the drink, and wander out. It's small steps, saw the compound angle where the sheer strakes meet the stem. (Mark it out twice and check it again)
Break the edges of the sheer strakes with a block plane cause I am sick of splinters.
Tidy up a notch or two on the frames.
Now I'm nearly ready to steam the sheer strakes and bend them into place.
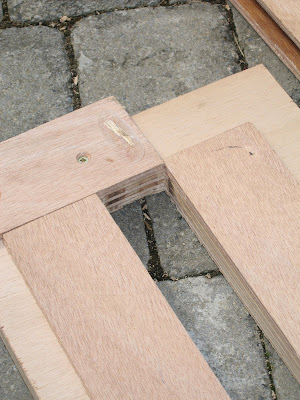
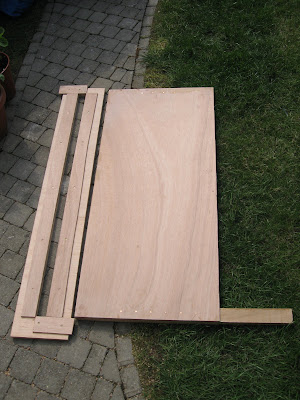
The chines rested on the frames, that made it easy to put them in place. The sheers will be underneath the frame notches. I am trying to decide if I should screw short battens to the bottom of each frame to rest the sheers on while I bend them into place, or just use cord slings.
Battens are more work up front, easier to bend the sheers in place, but will be in the way when I go to bevel the notches.
Slings may be too slow to get right when the sheer is cooling off from the steamer.
Battens first, then replace them with slings ?
As usual, lots of ancillary work makes the primary job go smoothly. If you ever see a craftsman work, and wonder how he does it all so easily, ask him, how much preparation has gone in that you didn't get to see !!!
Sunday, December 28, 2008
Saturday, December 27, 2008
Christmas Helpers
I was cleaning up the glue joints on my sheer strakes, when an old helper came along to supervise. He simply watched, approvingly, I presume, as he passed no scathing comments.
The joints came out just fine. A little work with a plane and the two pieces of wood just merge into one and other.
He used to drop along when I was digging the garden path and the stone circle. I guess he still associates me with upturned soil and worms.
I did manage to capture my supervisor on film....
Monday, December 22, 2008

Tuesday, December 16, 2008
Kitchen Glue Up
It's cold and wet, and I don't have a 20' long shed.
So how do I glue up the sheer strakes ?
In the kitchen of course. After the toddlers have toddled off to bed, I dragged the parts into the kitchen and glued them up. Of course this meant leaving an 18 foot long stick, complete with clamps, lying in the kitchen over night.
4 am comes and the littlest one awakes on cue. So I wander down to get her night time bottle, and duly trip over my glue up. No major worries, it's got enough clamps to hold the titanic together. And since this is a PU adhesive, it's tighter than a ducks...
Then at 6:30 the next morning, I have to get it out of the kitchen before I go to work.
Out through the window, since it will no longer fit around the corner to go out the back door.
The neighbours must certainly wonder what that "Crazy Fool" was doing wandering around the garden with a head torch at 6:30am and dragging a long stick out through the kitchen window.
Sunday, December 07, 2008
Remote Control Vac
I didn't spend a fortune on a shop vac that switches on when it senses the current drawn from your power tools. Switching it on and off is a PITA. Leave it running an you kill the motor. Leave it of and you poison your lungs.
I came across this tip in a wood working magazine (can't remember which one - sorry)
For less than €20 you can buy a remote control plug adaptor. Plug this into the wall, plug the vac into this, and a small pocket remote switches your vac on and off.
Perfect. Keep the remote in you pocket and you have no climbing back and forth around the shed to fire up the sucker. (pun intended - sorry)
Longer Sticks
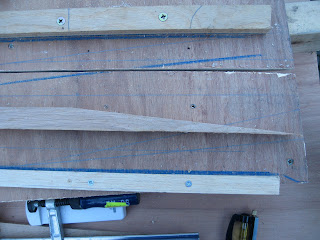
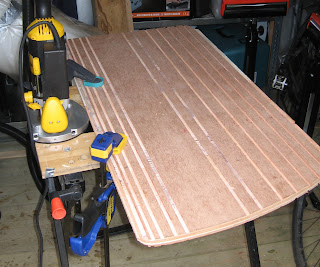
It's hard to find 16' oak. And harder to transport it ! So for the sheer strakes, I had to build some longer sticks. I built the traditional Scarf Jig.
As you can see it's a 2x4 to clamp the oak too, and a guide rail for the circular saw.
The 2x4 was not square (who would have thought it?) so I had to set the saw at a slight angle to make a square cut. For once easier done than said.

Here you can see the four cuts. Not bad for a first try.
I need to tidy up the saw burn, but otherwise, happy days.

The view from above. As with everything preparation is 90% of the work, actually cutting the wood took seconds 8-)
As you can see it's a 2x4 to clamp the oak too, and a guide rail for the circular saw.
The 2x4 was not square (who would have thought it?) so I had to set the saw at a slight angle to make a square cut. For once easier done than said.

I need to tidy up the saw burn, but otherwise, happy days.


As always the question, Epoxy or Balcotan Marine PU ? It's a nice smooth flat surface, that I can clamp good and tight and it will be above the water line. I'm leaning towards Balcotan PU. The test peice that I glued together with balcotan and left out in the weather, left in the shed, and generally abused is still holding strong.
Gluing it straight is just means I need something to clamp it too.
Monday, November 24, 2008
Sharper Still
One thing that I found was a buffing wheel on an arbour on my drill with some polishing compound will take the edge from "cuts a few hairs and scratches my arm" to " shaves cleanly, removing every single hair with ease".
You still need to get the back flat and put a reasonable edge on, otherwise you get a nice polished blunt edge....
You still need to get the back flat and put a reasonable edge on, otherwise you get a nice polished blunt edge....
Tuesday, November 18, 2008
Sharpening
Having a miserable cold, and being able to do feck all, I tried sharpening up a few chisels. It's theraputic. Back and forward, back an forward, change up a stone, repeat.
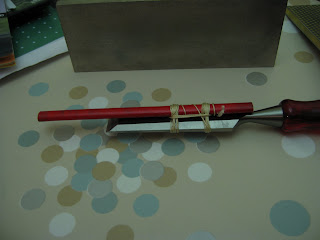
Of course we all know the Back of the chisel is the important part for sharpening. Here's a simple idea to make it a little easier to hold the chisel steady and flat on the stone, and make life a lot easier on your fingers.
Just whip a pencil onto the chisel as shown with heavy string. Every second loop, go around the pencil and change direction - this locks the pencil in place.
Two whippings 1 1/2 inches apart is about right.
 You just can see in this picture, a low spot just at the business end of the blade (top as you look at the picture). It will never be sharp until I get down to that spot. One thing that helps is only flatten the last inch.
 The traditional test it shaving hairs off the back of your arm. For those who think that's a myth.... Dada.... Real Live Arm Hairs
This was brought to you by DMT diamond whet stones. Including the XXCoarse, Coarse, XFine and XXFine.
Of course we all know the Back of the chisel is the important part for sharpening. Here's a simple idea to make it a little easier to hold the chisel steady and flat on the stone, and make life a lot easier on your fingers.
Just whip a pencil onto the chisel as shown with heavy string. Every second loop, go around the pencil and change direction - this locks the pencil in place.
Two whippings 1 1/2 inches apart is about right.
You just can see in this picture, a low spot just at the business end of the blade (top as you look at the picture). It will never be sharp until I get down to that spot. One thing that helps is only flatten the last inch. The traditional test it shaving hairs off the back of your arm. For those who think that's a myth.... Dada.... Real Live Arm Hairs
This was brought to you by DMT diamond whet stones. Including the XXCoarse, Coarse, XFine and XXFine.
Friday, November 07, 2008
A quick update......
I have removed the waxed deck screws in the first chine, they came out without even a struggle. I was a little concerned that the epoxy might have managed to get a grip, but the wax worked out just fine.
A little aside, wax melts just fine in the microwave, but it goes on really thick to COLD screws. I think that next time I will heat the screws in boiling water too. Then they won't cool down the wax so much and come out with 1/8" coatings.
I have replaced the deck screws with Bronze screws. An Old Brace that belonged to my grandfather has provided excellent service in setting the screws, as it gives a nice fine control rather than just stripping the head out as power tools can. Bronze is soooo soft.
I have glued and screwed the second chine. Next on my list is cutting the sheer clamps. Since I could not get 16' oak, I will have to scarf these in the aft section where there's not too much curvature.
Fitting these will be "fun" as firstly I'll be working UP from ground level to fit the notches, and secondly the starboard chine (if the boat were right way up) is quite near the wall and the shrubs.
I am not really sure how my wife is going to react when I propose cutting back (down?) those shrubs for glassing and painting operation. 8-(
Monday, November 03, 2008
Block and tackle.
 I got a few of these cheap and cheerful pulleys on ebay. Not for sailing, but rather for building. A bit of 3mm or 4mm cord bought at your local hardware, and a pair of these make pulling the chines into place a whole world easier.
 Try getting a bar clamp to do that !!
Gluing Chines
I did spend some time figuring out how to glue the chines logs in place. At about 14 foot long, they are quite unwieldly, and epoxy is slipperier that a slippy thing in slippy sauce. It's all very well saying the screws will hold it in place, but as you try to position the end at the transom, or perhaps at the stem, and the other you suddenly find this wisdom somewhat incomplete, as your epoxy starts to set.
One simple solution is to screw it in place staring at the middle without glue. Then mix up the epoxy suitably stiffened with amorphous silica. Only then do you unscrew the aft half of the chine, whack on the glue, then screw it back in place. The other end is suitable tamed. Then unscrew the forward half, apply the glue and replace it. Simple. It's like having a strong patient helper at the other end.
I got truly sick of stripping the head off the (expensive) bronze screws, so now
I use square head deck screws dipped in molten bees wax to hold things together. Much stronger than Bronze. And square heads just don't strip out. When it's suitably set (which may be several days, it's cold out there) I will replace the galvanised deck screws with Bronze.
I am assuming that there will not be so much epoxy in the existing screw hole that it prevents me inserting the bronze ones. Wish me luck.
Tuesday, October 28, 2008
I really need a boat shed.
When you are trying to build a boat outside, you need, not just good weather, but some likelihood of good weather for the next few hours.
So with showers making a regular appearance, I set up a "lathe" in my garden shed using a 650 watt drill, and a bolt set into 3/4 inch ply as a chuck.
I quickly gave up trying to use a chisel, perhaps I needed a little instruction, but the chisel simply bit into the wood and bent the bolt.
Attempt number two with a stanley surform round plane worked a lot better. I was able to shape some nice covers for the Center Board pivot.
A Forstner bit allowed me to cut a rebate on the inside to hold a gasket, since this will be oak on oak, a little rubber should make a better seal.
Now it feels like I am making progress again.
Fitting the chine
The next job was fitting the chine log. It's been sitting in place for a while in the poorly fitted notches. A great big todo.
I go to spend a few hours this weekend with a mallet and a few sharp chisels fixing the notches.
One thing I figured out is that while I am drawing things tight, square drive galvansied deck screws are way better than bronze. Bronze screws are way too expensive and strip too easily. For the gluing, I will wax the deck screws, bond the lot with epoxy and then replace the screws with bronze. I have about two frames to go on one side and I can start gluing.
It's been a while....
It's been a while.... I was doing exams, so it most of my "free" time was spent studying. Now that that's over for another few months, I've made some progress on the boat.
I have glued the CB case to the Keel. This fun, as you have to glue the cb case to the keel, and to the frames that cross the keel for and aft the CB case. It has to be strong, as the CB case must not leak, and will be one of the attachment point for the main sheet. Once the epoxy clock starts ticking, you can't hang about.
The CB case and bedlogs slot into the keel like a through tenon, just a very very big tenon. I slid the for and aft frames out a few inches, coated the CB case with thickened epoxy and slotted it into place. A few clamps brought it up snug. Then I pasted the ends where it would meet the frames with more epoxy and slid them back into place. These frames also needed epoxy where they joined the keel. It's all dry now and looks rock solid. Bronze screws will follow.
Then I glued and screwed the keel and the remaining frames, and glued and bolted the keel to the stem. (the bolts are home made from bronze bar a good quality die cuts threads in bronze without too much trouble. Don't cheap out and buy a cheapo tap and die set. Just buy the sizes you need. Life is hard enough without cheap tools)
D
Tuesday, August 12, 2008
The Center Board
The Irish Rainy Season has started. We learned in school that Ireland had warm sunny summers. This was obviously a Blatent Lie. I've been wearing a coat to work in the mornings.
I can still work in the shed though 8-)
I used a router to cut slots at the correct depths base don the NACA foils. This gave me a guide for sanding.
You can see the lines cut in the CB here.
Here you get a good idea of how it looks from the end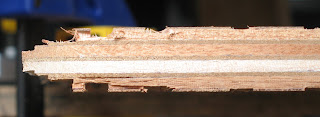
And here's what it looks like as I start to sand one side.
I can still work in the shed though 8-)
I used a router to cut slots at the correct depths base don the NACA foils. This gave me a guide for sanding.
You can see the lines cut in the CB here.

Here you get a good idea of how it looks from the end

And here's what it looks like as I start to sand one side.

Monday, July 21, 2008
The angle of the chine
 I used a bar clamp, and a cord to a bucket full of water to hold the chine at the correct angle. A towel soaked with a few kettles of boiling water gave the oak enough flexibility to twist.
 A Japanese pull saw really is the best thing since sliced wood.
I was pretty happy with the result.
The chine on the other side is another days work.
 Realising that It would be easier to do the slot for the Center board case now rather than later, I took a break from steaming. I used the template that I made up earlier and a cheap and cheerful JCB 1/2" router. I just used a simple trim bit without a bearing (the shaft acts as a bearing). I cut out most of the centre of the slot first with a jigsaw. This made for less routing and less sawdust), but it did mean that some of the cut was lifting the grain. Not usually a good plan . Luckily Epoxy, and the fact that this will be well out of sight will save the day.
Saturday, July 19, 2008
Steaming the Chines
 I had planned to use a drain pipe. But a little reading led me to the inconvient truth about PVC. It starts to melt if you run steam through it, and it collapses under its own weight. So this is Aluminium Air Conditioning ducting. It arrives compressed concertina like and you simply stretch it.
 Without a little insulation, it would not keep the wood hot, so some cheap attic insulation and a bit of cord and we are set. I just used a steam wallpaper stripper as a steam source and left if cook while I got on with some other bits and pieces.
 Here you see the two chines clamped roughly in place. There's still work to do, but progress is progress.
Oh, yes, heavy gardenning gloves are your friend here, the Aluminium is hot, the steam is hot and the oak is hot.
Monday, June 30, 2008
Various other commitments....
That's always the reason for so little progress. This weekend I managed to steal about 2 hours to work on the boat.
An hour spent sharpening up some chisels. A flat waterstone grinder is the thing for flattening the back of your chisels. But the jig is really for planer blades. It's not great for chisels. A 120 grit Japanese Water stone will reshape your chisel in short order, and a set of Ice Bear Waterstones will get it silly sharp.
I cheat and use the Veritas Mk II sharpening Jig. Maybe with more practice...
All this sharpening was to allow me to spend the second hour changing the angle of some notches in the frames that join the transom. Of course if I had cut them right in the first place....
At any rate, it's kind of scary to see how easily a truly sharp chisel will cut through Solid Oak, even end Grain. Fingers Behind the blade and all that.
Wednesday, June 11, 2008
Beale Park 2008
In spite of promises of dark overcast days and heavy showers, the main concern this weekend in Reading was sunburn.
We made our second annual visit to the Beale Park boat show.

Amongst the highlights for me was bringing Sarah - my 18 month old daughter out sailing on a Bay Raider. Lovely boat. I want one. Actually, How about a Sea Raider.

Sarah appeared to love it, though she was trying to lean out overboard, and was saying "swim swim swim". We did manage to avoid testing her life jacket on this occasion.
Some time later I managed to find a kind gentleman from the wooden boat builders association who taught me to eye splice.
It's one of those things that's not really that difficult when you see it done, but try learning it from a book. If you follow the link to the eyesplice above, it all hinges on picture 9.
Some of the work there on display was amazing, including a newly build Salcombe Yawl. Nice, but a little spendy at £25,596 (a little under $50,000). I guess you get what you pay for.
There were rowing skiffs, sail boats, electric launches and steam boats..

To top it all off - we stayed at the Beetle and Wedge a nice restaurant along the thames which has a few rooms for B&B. The food was fantastic. The staff made us feel like old friends, and Sarah got to feed the ducks at the river bank. The ducks were simply brazen. While Sarah was tearing bits of bread a slice off to through to the ducks, one came around behind her and snatched the slice clean from her hands.
Four days of very civilised living in the english countryside. Excellent.
We made our second annual visit to the Beale Park boat show.
Amongst the highlights for me was bringing Sarah - my 18 month old daughter out sailing on a Bay Raider. Lovely boat. I want one. Actually, How about a Sea Raider.
Sarah appeared to love it, though she was trying to lean out overboard, and was saying "swim swim swim". We did manage to avoid testing her life jacket on this occasion.
Some time later I managed to find a kind gentleman from the wooden boat builders association who taught me to eye splice.
It's one of those things that's not really that difficult when you see it done, but try learning it from a book. If you follow the link to the eyesplice above, it all hinges on picture 9.
Some of the work there on display was amazing, including a newly build Salcombe Yawl. Nice, but a little spendy at £25,596 (a little under $50,000). I guess you get what you pay for.
There were rowing skiffs, sail boats, electric launches and steam boats..
To top it all off - we stayed at the Beetle and Wedge a nice restaurant along the thames which has a few rooms for B&B. The food was fantastic. The staff made us feel like old friends, and Sarah got to feed the ducks at the river bank. The ducks were simply brazen. While Sarah was tearing bits of bread a slice off to through to the ducks, one came around behind her and snatched the slice clean from her hands.
Four days of very civilised living in the english countryside. Excellent.
Wednesday, June 04, 2008
Thanks Bro'
I convinced my brother to come join me for a spot of boat building. I had 4 long (14'-16') oak planks to plane down to 22mm and cut into long strips for battens.
Hard to man handle all alone.
My PT85 was quite inadequate for the task. It would plane oak just fine for a while, but then just overheat and give up the ghost. Unless I wanted to run a board through, then shoot the breeze for 20 minutes and repeat (not a bad idea, but my time is limited) then I needed bigger iron.
I rented a Makita 2012NB from SamHire for the weekend. Like many hire shops they treat weekends as non business days, so I got it for 3 days for the price of 1.5 - In the end, due to various commitments, I only used it for about 3/4 of a day - but that was enough.
We spent quite a while running 15' planks through the planer, and got things down to a fine art. In retrospect, I should have just paid The Lisnavagh Timber Project a few bob to run it through their big industrial planer and it would only have taken an hour or so. You live and learn.
Cutting the battens is made easier by a very simple trick. Clamp the planks to bits of scrap on top of your workbenches. Then set the blade so that it cuts the oak, and cuts into, but not through the scrap. Now you don't have to get inventive about how you clamp the wood so as not to cut your workbenchs in half. So simple.
In fact for the first few battens, the oak was heavy enough not to even need clamps - do clamp the scrap bits - unless you want to see how far your saw can fling them.
Next up will be steaming the chine logs and the sheer clamps.
Sunday, May 25, 2008
An our here and and hour there
I started by screwing strips of ply around the Centerboard case onto a logn 3/4" board. Then I cut out most of the slot with a jig saw, and tidied up the rest with a router and a bearing guide bit. A little work with a chisel to sort the corners and it's a perfect match. I should be able to use this template to cut the slot in the keel.
Easier than trying to screw separate strips of ply to the keel itself.
You can see the start of the CB case here with the template.
Cutting the actual slot in the keel is a big step as this is a 12 foot long board, carefully cut and planed. A mistake there would be painful.
Incidently, I have found that a large nail punch helps so much in avoiding the hammer marks. 8-)
Monday, May 05, 2008
It seems ok....
The CB case seems to have glued up ok.
I tidied it up today, added a few bronze ring nails for good measure. An oversized nail set allows you to smack these down flush without leaving hammer marks all over the place.
There was a hole to be drilled through the Oak at the forward end of the case the would have been whole lot easier to drill before I put it all together. The main problem was not drilling the hole, but cleaning up the break out from the drill bit. Since the line to raise the Centerboard is deadended through this hole, a little rounding of the sharp edges was required.
It's amazing where you can fit a dremmel.
Next step is the keel. I need to clamp it in place, and tidy up the CB bed logs to fit. Then I have to cut the slot for the CB through the keel.
That's one of those jobs that if you mess it up, there really is nothing else to do but start again with a new peice of wood. An a clear 4" x 1 1/8" x 12' is an expensive peice to mess up - never mind the time it took to cut and plane it.
Again, wish me luck.
Sunday, May 04, 2008
Epoxy - A batch gone off
I started to glue up the Centerboard case today. I sanded the Oak and precoated it with epoxy.
Then I mixed up a batch of epoxy and filler, but while I was working on one side of the CB case, the remaining epoxy and filler was just getting warmed up.
When I went back to the mixing cup, it was hot, really hot, and had a big solid lump in the middle.
By now I had a half glued up CB case, and no epoxy ready. I mixed up a second smaller batch as quickly as I could, but still making sure I stirred it enough. So now I have to wait until tomorrow evening until I can see if it glued up OK.
Wish me luck.
Saturday, March 29, 2008
Glassing Pictures
 First up is my epoxy stir stick. Add a cheap battery powered drill and a good pair of protective goggles and you can go to town on stirring your epoxy.
 Here you can see the corner where the glass lifted, I have cut away the lifted glass. I will sand this down and patch it up later.
 When you add the epoxy, the glass becomes almost transparent. You can see the pattern of the weave, which apparently is about right. Too much epoxy in the first pass, and the glass will float off the ply.
 Alway wear overalls, goggles, gloves and impermeable shoes when you start slopping epoxy around. The stuff gets everywhere.
Imagine if these had been sneakers, I might have found out later when I tried to take them off that the epoxy had soaked through and bonded my shoes and socks to my feet.
Thursday, March 27, 2008
Centerboard case in progress...
The first glassing went well.
It's amazing to see what was a white opaque glass cloth become transparent with the application of a litte epoxy. The grain of the ply looks wonderful. I still need a second layer of epoxy to fill the weave. Apparently that's the way it should be, too much epoxy in the first pass, and the cloth floats off the wood.
I need to fix a corner where the glass lifted a little. I see my first practice at lapping glass cloth. Wish me luck.
D
Tuesday, March 25, 2008
Starting the Centerboard Case
Now that the new shed is in place, and all the boat parts are out of the kitchen (really) I've started back at work on the boat. I have more free space in the new shed, then total space in the old shed.
I took one side of the centerboard case and made an attempt at glassing it. Later today I will know how well it went. It's like the good old days of film cameras, when you had to wait to see the result of your work.
I had no idea of how much to mix, but since I was working on a small area, I was not too worried about the epoxy setting up while I mixed up more. I can see that for a large area, having an assistant to do the mixing would help.
I had left the cloth long around the edges of the plywood panel, but as I squeeged in the epoxy, the weight of the hanging cloth was causing the it to lift just inside the edge of the plywood, in much the same way as if I was trying to glass a right angle, once I trimed the cloth to an inch or so, it was fine.
Now I simply have to wait till it sets up, and see if it had made a good bond, or not. Then I'll bang on another layer of epoxy and see how it all looks.
Pictures will of course follow.
Wednesday, March 05, 2008
I have shed my shed
In the quest for more room for high speed, sharp, spinning thing I have decided to move up from an 8 x 6 shed to a 10 x 8 shed.
Now all my stuff is in the attic - moving it up two flights of stairs must constitute my exercise quota for the day.
You would think that knocking down a leaky, somewhat rotten shed would be trivial. The down side it that it's only rotten in places.
In order to fit it in a mini skip, I need to break it up pretty small. This takes a whole lot more effort than you would expect. I really wanted to avoid using power tools since all this wood is treated with nasty preservatives, and I did not want to leave fine toxic sawdust in my back garden.
Now I wait for the new shed to arrive, and I catch up on my Maths degree. Boat work may be delayed a little.... 8-(
Thursday, February 28, 2008
Mixing Epoxy

I took a tongue depressor (bought by the box) and a disposable chopstick.
I Cut about 4 inches off a chopstick, then cut the tongue depressor in half. Taped them together to make a long narrow spade.
I put the chopstick end in an old cheap variable speed electric drill, and Voila, one gloop mixer.
When adding Silica and Glass Beads to the mix, I folded them in by hand first, then mixed it with the drill.
I wore gloves, a face mask, goggles and a boiler suit and did this in a shed.
I do appreciate that grabbing a handful of trigger on the drill would result in a hazardous epoxy spray.
I intend to get a chuck for my electric screwdriver, since this has a fixed and slow rpm.
I suspect this would not be great for a clearcoat, as you stand to introduce to many bubbles into the mix.
Disclaimer: If you try this yourself, take all precautions you deam necessary. This has the potential to go horribly wrong. If you do not understand what will happen if you grab to much trigger, then sit down and think about it until you do understand. All of the ingredients in an Epoxy Gloop are harmful to you in some way or other.
Sunday, February 24, 2008
The Stem

I didn't like the idea of putting screws into the side of the ply that makes up the stem. Screws into the side of ply are not generally considered "A Good Thing (tm)".
Instead I bought some bronse rod, a tap and die set (spend some money here. Cheap taps and dies are marginally less use than chocolate teapots), and set about making double ended bolts.
I clamped the stem in place, using a block cut at 90 deg on the table saw, and drilled two holes right through the frame into the stem.
I then drilled through the side of the stem, to intersect with these holes, to put nuts in. This gives me a sort of bed bolt.
I spent some time with a sharp plane making sure the end of the stem was at 90 deg, then I prepared some Epoxy, Silica and glass beads.
I soaked the end of the stem in epoxy first, this was to prevent the ply wicking the epoxy away from the joint. Then I glooped up the joint, and bolted it all in place.

As you can see in the photo, the epoxy could have been neater, but I doubt that anyone will get much of a look at this joint. I'll cut back the bolts next. Then clamp it all back in place on the scaffold.
Just to see the lines

I ran some softwood battens along the frames to see if things lined up, and also to see how it might look.
It is starting to look kind of like a boat.
There's still so much to do. But it's progress.
Incidently, The stem is just sitting there in place I see a bit of goo and some bronze in it's future.
D
Wednesday, February 13, 2008
Lining It All Up
To get the frames in the right places, I cut a few blocks with accurate 90 deg Angles on my table saw. (A sled helps for this)
Then I clamped these in pairs to the frames, now the frames would sit bolt upright at 90 deg to the scaffold. A roofing square allowed my to check that the frames were square across the scaffold.
I marked off the distances on a long batten and ran that from the transom.
A quick check with Pythagoras ensured me that the difference between measuring along the batten and the strict horizontal distance was less than 1/16 of an inch, so I just ignored it.
The frames are now held in place by these blocks which are pocket hole screwed to the scaffold.
I now need to center the frames left and right and make sure that they are level.
Just to see what it looked like, I cut a half dozen soft wood battens and held them up against the frame notches, They line up pretty well and it starts to look like a boat.
Pictures will follow soon.
Saturday, February 02, 2008
Out of the kitchen
 In spite the forecast, it's hardly rained at all today, but it always appears to be on the point of a downpour. You know, two or three drops here and there.
I took a chance and clamped the frames in place on the scaffold. They are just roughly in place so that I could get an idea of the final shape and size. Also the front frame needs cut into the scafold to sit a few inches lower.
I think that for final placing I will cut pairs or square blocks to clamp fore and aft each frame so that the frames sit vertically, that will mean one less thing I need to worry about as I place them.
Right now, the blue plastic is covering it all once again, and as usual, I await better weather.
D
Monday, January 28, 2008
I now have a scaffold
You know, in spit of reading Steve Henry's advice on the GlenL Forums, I went and built the scaffold and then looked at the the frame sitting by the wall and thought "Ah fiddlesticks*, Steve warned me not to do that.".
One of the frames has a cross piece and needs to be in place before you screw the scaffold together. A little bit of dissasembly followed.
I now have a scaffold, the transom is mounted, one frame is on the scaffold. I need another good sunday to position the frames properly. Then we get our kitchen back.
I built the scaffold about 6 inches higher than the diagram, to make it easier to work on.
I suspect that I will need to shim some of the frames to make sure that everything is level, since there are a few individualities in them, but that should be easy enough.
Pic's will follow once I have all the frames set up.
* "Fiddlesticks" may not have been the exact word that came to mind.
Tuesday, January 15, 2008
Inch by Inch....

Cutting the Centerboard Case Logs went well. The bandsaw coped admirably, those dinky 3 wheel models may not be perfect, but they are better than a Jigsaw. I wandered more than the saw blade, but that's what course sandpaper is for.
The wood for the scaffold had arrived. I have also built a simple water level out of a 5 meter clear plastic tube (ebay), a plastic bottle, and some silicon sealant. Add some soap to the water to reduce the meniscus, and it's more accurate than I'll ever be. Total Cost, a whole lot less than a high end laser level, and perfectly visible in daylight.
I now have everything I need to start assembling the frames.
On the next good weather day, I'll be cutting the scaffold. The verticals will be pointed and simply pounded into the garden. I guess that once I am finished building the boat, I will have to dig and reseed that section of the grass.
This will get all the frames out of the kitchen at last. (Thanks for being so patient Caroline.)
Subscribe to:
Posts (Atom)

