Tuesday, December 29, 2009

Pictures at last

As I could now put it in the water, and get in, and it would float, I now claim it's an unfinished boat. It is no longer a pile of sticks.


Monday, December 21, 2009

I’ve started painting the inside.

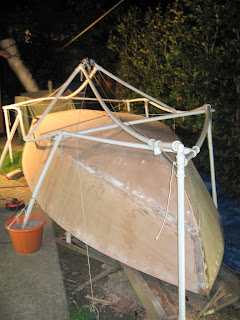
I’m painting at night, in the cold, with a site lamp and a head torch. I must look even stranger than usual.

One thing I realised is that when you have lots of battens, chines, frames etc to paint, you get a lot less than the advertised coverage for a tin of paint. They assume you are painting a large flat area. When you have to work in nooks and crannies, expect to get about half the coverage.

I’m using Blake’s (now Hemple) paints. The inside is coated with epoxy, then white primer and then 2 (soon to be 3) coats of pale cream multicoat.

It is starting to look pretty well.

Thursday, October 29, 2009

Just a brief update

The boat is now upright on a combi trailer.

I have two tent poles across the boat holding up a Tarp.

The inside is now sealed with epoxy.

Sanding and painting starts next.

I'm still in two minds about adding a buoyancy compartment forward and aft, or just using buoyancy bags, or using foam slabs.

Monday, September 28, 2009

Thanks Guys

It was like a weird and wonderful Team Building Exercise.

All we had to do was move the boat from the back garden to the front garden.

The boat has a 6' beam. The lane between the houses is about 6'10". Plenty of room.

The fun bit was the 4'-5' high wall running down the middle of the lane.

We had a short false start where we were still bolted to the ground (my Fault, sorry guys).
Then the 7 of us lifted the boat to shoulder height and manoeuvred it up over the wall (sorry about the plants Caroline.)

I somehow ended up standing underneath the upturned hull, with my shoulders to the frame. It was my first real view of the inside.

We did our best to cripple my soon to be wed brother, by trying to drag him across the wall through a bush, but he was having none of it.

The Herculean Effort culminated in The Lady Caroline* being man handled into place, in the front garden and then carefully flipped over.

So Thanks Guys, In Alphabetical order Alan, Andrew, Colum, Connor, Oliver and Peter.

And thanks Andy and Trish for letting us use your garden in the move. I hope Bonnie forgives us for locking her in the kennel throughout.

And thanks again to Caroline, my wife for putting up with this, the boat, the mess, the invasion of the house, the time spent, etc. etc. etc.

* The boat, not my wife.

Thursday, September 24, 2009

From the Air

This is from google maps.

You can clearly see the blue tarp that covers the boat in my back yard.

Yes, it will fit out between the houses.

(I hope)

Monday, September 21, 2009

Helpful people

It's amazing how some people are just so helpful. Take the guys at http://www.chinawindyachts.co.uk/ I needed some stuff in a hurry, no problem, I rang on Friday, they got stuff in that was not already in stock and they shipped monday morning. Bear in mind that my order was a couple of hundred Euro, and they know I'm a hobby builder. Peter takes a genuine interest in his customers, he was able to offer help and advice.

Many thanks.

Tuesday, September 15, 2009

Pics

As promised, pics of the Hull.

I have filled and sanded most of the screw holes on the near side in the top pic. And as of about half an hour ago, I have filled the remaining screw holes.

The Epoxy, Glass beads, and microfibers sands easily. It seems like a good mix for filling.

I used a router, a roundover bit and a batten to round over the entrance to the CB for glassing.

And I have glassed the transom. This is a small and uncomplicated area, but it's near vertical, so you have to be careful about runs.


Sunday, September 06, 2009

I no longer feel like a fraud referring to "my boat".

Sorry there are no pics to go with this, but I finished up working last night, outside under lights at about 11:30pm.

It was gluing, screwing and filling screw holes, so the neighbours did get to sleep. 8-)

The last panel is now in place. It needs to be trimmed, but the hull is now complete.

I no longer feel like a fraud referring to "my boat".

I also started the process of filling the screw holes. Some screws needed to be reset a little deeper. That was easy enough. I tried three mixes for filling. Epoxy and:
  • Oak Sawdust from my sander
  • Glass Spheres and Silica
  • Glass Spheres and Microfibers.
The Oak Sawdust is not as fine, and is harder to sand. On the whole I won't be using it again for filling.

The Glass Spheres on their own don't thicken up, and seep to remain runny, so I added a little silica to the first batch. It's smooth, sands easily and is easy to work with.

I also filed more screw holes last night with the Glass Spheres and microfibers to thicken it. This is smooth and works well. I'll let you know how sanding goes.

Incidently, for sanding I used a Ryobi Random Orbital and some 40 grit disks. Worked like a charm. I had tried hand sanding first, but it's unreasonable to expect my grandchildren to finish the boat.

I should be ready to start glassing soon. I'll start with the transom. Less to sand off if I mess up 8-)

Photos will arrive when it stops raining again. 8-(

Monday, August 31, 2009

So close.......

The last panel is trimmed to fit, it is held in place with screws and plywood washers, and it has had boiling water poured all over it with towels to hold the hot water in place.

All in all it's so nearly a boat.

But On Sunday it didn't rain as much as it always looked like it would rain any second. This is a problem for building out of doors.

There remains some sanding of the battens to do before I can start gluing. I need to do the this in the daytime (weekend) as power sanding when I get home from work might not be a good way to win friends and influence people now that kiddies are back at school and early to bed.

The forecast looks good for this weekend. I should have a complete hull.

Then I need to set a few bronze screws that are sitting proud, fill the remainder of the screw holes and start the whole sanding and glassing process. There's a bit of tidy up sanding to do at the scarfs, but not too much.

Shortly after this I will be moving the boat out to the front garden to make way for some building work. That should be fun.

Sunday, August 23, 2009

burning the midnight oil....

At about 8pm the kiddies were off to bed, so I nipped out to just sand the chines and keel, ready for a glue up the next night. But that didn't take long, so I thought, I'm here now, let's glue.

A good plan and a bad one. I had not yet marked all the spots for the screws. It's best to do this before you start mixing glue. Anyhow... I did the usual, coat with neat epoxy, then mix up epoxy and microfibers, then screw the panel into place.

I knew I had one slight "dip" in the chine, so I filled this out with epoxy and chopped strands, and pretty much left the panel at that point to just follow it's curve. It worked out well.

Half way though my halogen site lamp blew. So I had to finish the job, mixing epoxy and microfibers, and marking and drilling and screwing using a portable flourescent lamp powered off a drill battery. (Makita rocks)

I finished up at about 11:35pm.

Most of that panel is now trimmed back, and I now have only one panel left to do. Tuesday looks like a good evening for boat building. And I have some spare bulbs for my site lamp now.

I can still look inside the remaining "hole" in the boat, and it all looks sort of boat like from the inside.

I then need to trim the centerboard slot back properly (I am still wondering how to use a roundover bit given the gradually changing slope of the bottom)

Then glass it and turn it.

Then I need to get it out of the back garden. I'll pin a temporary "deck" into place to give it some strength before the lift, It should be interesting.

Tuesday, August 18, 2009

Cutting Limbers after the fact.

I played with a tiny ratchet driver and a 6mm auger drill bit. I clamped a scrap batten to a work bench, and I can make a 6mm hole in the batten about 1mm from the bench. This will do just fine. So when the hull is turned I'll do the job on the three battens. I will probably have to cut the auger short, and glue on a socket to the end so that I can fit it between the battens, but that's no big deal.

I will also reinforce the battens on both sides with an extra 1/2 inch from the transom to the next frame. Since these will be flat surfaces, I'll use Balcotan (Marine PU) for the Oak. Previous tests show it works just fine. My test lamination has been knocking about in the garden and in the shed on and off, unpainted for 2 years and it's still solid.

Sunday, August 16, 2009

Getting there....


I've started to fit the foreward sections of the hull.

Both the aft sections are now glued, screwed, and trimmed (Since I took the photo above)


The squares of plywood are used as Giant washers.

Monday, August 10, 2009

And this is what the inside looks like

I just held the camera under the boat.The unplaned wood is the building frame and there is an oak plank in the top left corner of the pic.
Posted by Picasa

Sunday, August 09, 2009

Oops


Remember me posting "Note to self: I still have the limbers to cut." back about here. Well I was busy congratulating myself on a nicely glued up panel, trimmed and all, when I realised I'd entirely forgotten about the limber holes in the battens and keel.

I've been on the forums and had lots of advice, from "you don't really need them" to various ways of fixing the problem. I've cut the limbers for the other side now, this little detail will have to wait until I turn the hull and try to figure out how I'm going to drill a hole at the bottom of a 1" batten beside the plywood, with only 2" to the next batten.

The current plan is to use a right angle mini ratchet screw driver to run a screw through the batten.

Once that's through, I will feed a coping saw blade through the screw hole, and start the long slow process of cutting out the limber. I expect to have to make up a holder but that will be the least of my worries. A dowel and sandpaper should help me finish off.

The battens from the transom to the last frame aft will be reinforced with an extra 1/2" of oak. This will mean that even with a 3/8" hole, there will still be 1" of Oak. Add the strength of the . Add the strength of the plywood to that and It should be plenty strong.


Thursday, August 06, 2009

1 Aft panel = Two evenings work

The oak battens, chine and keel that I was going to glue the aft bottom panel to were all tarnished from just being open to the air. It took most of the first evening and 3 belts (40 grit) on my belt sander to remove all the tarnish and leave nice clean wood to glue up. New belts are cheaper than the added time it takes when you persist in using a dead one, and dead ones burnish a surface. That's not good for gluing.

I'd gotten an attachment to allow me to connect my bosch sander to a vac, so there practically no mess.

I clamped a few guide blocks in place, and put in a few locating screws. This allowed me to consistently replace the panel. Then I marked up the places for all the screws, it takes long enough that you don't want to be doing that while the glue is setting up.

The next evening I coated the oak in neat epoxy and then pasted on micro fibre mix. A little careful lifting and the bottom panel was in place.

There's ¾" screws every 3 inches on the chine and keel and every 6 inches on the 3 battens. Add in the screws on the transom and you suddenly have about 100 screws. Two 18 volt drill/drivers means that you don't have to keep swapping drill bit/driver bit.

When I get home I'll see how well it all went.

Even so it was well dark by the time I finished, my builders site lamp is getting a good workout these evening.

More sanding this evening to start the aft panel on the other side.


Monday, August 03, 2009

And now the Scarfes are cut

One thing to note is that if you run the power planer at 90 degrees to the scarf, some of the plies come off as long splinters than quickly block the vac outlet. Run at 45 degrees and your vac will get most of the rubbish. When the vac outlet blocks up it's not subtle, suddenly there's bits everywhere.

The scarf joints are now cut, so I guess next up is to glue the aft panels in place, they don't require much in the way of fitting. Glue and trim to fit. The forward panels are cut about 2" over size so that I can screw in some locating holes, and trim them to fit. The forward panels must be trimmed before gluing, so the locating screws allow me to get the same position each time.

Then I'll apply lots of bend with towels and boiling water. A clamp on the edge of the panel, with some scrap ply backing to spread the load gives you something to tie a line to, then the panel can be hauled into place with a small block and tackle, and a rake load of clamps to pin down the progress as you make it.

The weather forecast is not looking good until the weekend.... But we'll see.

Friday, July 31, 2009

The front panels are rough cut....

I spent last night marking up and cutting out the forward part of the panels for the bottom of the hull.

I made up some patterns from scraps of ply to rough cut them (holding an 8'x4' panel against the hull to mark it off is not all that practical)

They are now clamped to the hull, with a few strategic clamps, and a few truckers hitches pulling the plywood into the required shape. I'll tighten them up each day as the wood takes a set.

I still need to scarf the foreward and aft panels together, but the bend is all well forward of the join, so it should not be a problem.

I can see a completed hull in my near future.

Wiley X Brick RX

I do like my eyes, not so much the charming boyish blue colour, but rather the whole seeing thing. It's pretty useful. They are however, not quite perfect, so I need glasses, and when I am working with high speed thingies like routers, or power saws, I need goggles over my glasses, and then it all steams up and I spend more time cleaning goggles and glasses than working on the boat.

Glasses on their own provide limited protection. If you can fit you fingers in behind the frame and touch your eyeball, then high speed sharp things can get in there too.

So I wandered down to the local optician, who had a selection of about 5 pairs of safety specs at about €200 a pair. Ouch.

This calls for a bit of surfing.

I found http://www.opticsplanet.net/ who even listed the temple size for the frames (handy when you have a 64cm head size) and I got a pair of Wiley X Brick RX prescription glasses made up for €120.

They have removeable foam padding for when you are sanding and want to keep dust out, and on hot days when you are more concerned with high speed flying pieces of blindness, you can take out the foam, and they fit nice and closely around your eyes sockets.


Monday, July 20, 2009

Glen L 14 Sailing Video

Not mine, though some day I will finish and I will post sailing videos of my own.....

This is a Glen L 14 in Vancouver

Monday, July 13, 2009

The Bottom


I've started the bottom planking.

2 sheets of 8x4 are now rough cut on the outsides, and fitted at the keelson.

You can see the work in progress here

When you place an 8x4 sheet up on the boat, and try to line up one side with the keel, you quickly notice that since the hull is curved the edge of the ply does not line up nicely with the center of the keel.

A quick snap of a chalk line, or just running a marker on a jig down the side of the keelson will mark the curve you need to cut. Japanese saws are fantastic for cutting long fair curves in 1/4 ply as it's so easy to line them up with the curve as you saw.

I tacked the first panel in place, and then marked the second panel against the first by tapping it down on carbon paper while pulling the carbon paper through the gap. Where the second sheet meets the edge of the first, you get a neat black line to saw to.

I've more scarfing to do, and I have to then fit the forward bottom panels, but very soon I'll have a hull.

Incidentally, this weekend I spent a whole lot of time watching for rain clouds blowing in, covering everything over until they blow by, and uncovering again. A real PITA.

Next boat I build will be under shelter.

Friday, July 10, 2009

I forgot to oil the screws....

When you put in temporary screws to hold everything together while the epoxy kicks, you really should oil or wax the screws so that the epoxy cannot stick to them.

Otherwise you will break off two screws about half way down and leave steel bits embedded in the oak frames well out of reach, and then spend the next hour heating each screw with a gas powered soldering iron to soften the epoxy so that you can extract them. You will find that about 20 seconds of blowtorch setting per screw works. When you have use large washers, they act as a heat sink and you will need more.

If you have not used washers, and the screw heads are in the wood, then a traditional electric soldering iron touching the screw will probably work, it will just take longer.

Perviously I had tried the trend grabit and concluded that bronze was too soft and it would not work, but after reading a review where they emphasised "slow speed" as the key to getting it to work, I tried it again after I stripped a haed on a 2" bronze screw which was supposed to hold down a batten. It was still proud about 1/8", like the Grand old Duke of York, neither up nor down.

Sure enough the trend grabit grabbed it and it came out nice and slowly.

Stripping one bronze screw out of 28 x 2" screws into Oak is a reasonable record.

It's all done now. Though I now have a pair of 1" long broken screw bits in my framing and no good way of getting them out. The deck screws broke in half as I started to unscrew them so the bits are about 1" down.

Thursday, July 09, 2009

Glued and Temporarily screwed in place

The battens are now glued and temporarily screwed in place. Deck screws, and large washers pull everything together while it all sets up. In a day or so, I'll pop out the deck screws, and redrill the holes and countersinks, and then pop in the Bronze screws.

I've epoxy coated all the areas that won't be accessible when the skin goes on, and the block and tackles still hold down the ends of the battens to pre-bend them.

Note to self: I still have the limbers to cut.


Sunday, July 05, 2009

An hour here and there....


That was about all I got this weekend, but it was still progress.

Here you can see me checking that the ply will sit nicely across the battens, and if you look closely at the outside batten, you can see the end is tidied up, it's curved, tapered and clamped down to induce a suitable curve in it.

I have the last batten sanded on the inside - I won't bother sanding the the outside where it will be glued and screwed to the plywood until I have cut and fitted the ply and I'm ready to get sticky with it.

The battens are all now drilled and held in place by deck screws.

I did remember to unscrew all the blocking that becomes inacessible once the battens are in place.

The next patch of good weather should see me able to epoxy the battens in place, and as with the chines, I'll used deck screws to draw everything up tight and then replace them with bronze when the glue sets up.

Bronze screws are just too soft to try screwing 2" into Oak and pulling a bend into battens as well.

Friday, July 03, 2009

Notch up a few more notches !!

The forward frame is basically done. A decent Rasp makes life easy. And a sheet of carbon copy paper put inbetween the batten and the notch lets you mark high spots for rasping.

I clamped a large scrap peice of ply in place at the forward frame/stem to make sure that it would all sit nicely.

Next I have to glue and screw them the battens in place.

I have a tiny block and tackle in place to pull down the front of the battens. I've clamped some offcuts to them, so that I can pull them down from one side, to introduce some twist as well as bend into them. This will make it a whole lot easier to bend the front of the ply.

I'm not entirely sure how I find the battens when the bottom plywood is in place, so that I can locate the screws. Any thoughts / detailed photos would be welcome.

Monday, June 29, 2009

When I get to turning it all over....


On thing that I have realised, is that the second frame, which has a cross piece that goes through the building scaffold is going to make things kind of fun when I get to rolling the boat.

I had initially thought I'd just disconnect the boat from the scaffold before putting on the bottom ply skin, and the weight would keep it in place, then I'd lift it off the scaffold and turn it.

While looking for all the things I'd want to do before putting the bottom on, it dawned on me that the frame that goes through the scaffold, second from the front in the picture opposite, is going to be a problem.

My scaffold is spiked into the ground. So I think that I will have to reach under the boat and cut the scaffold legs, then turn the whole boat scaffold and all and take apart the scaffold after the turn.

I'm glad I am trying to figure this out now, not later.

It still looks the same....

I got a good bit done this weekend.

The fitting at the transom is done.

All the battens are now trimmed to their final length and tapered, the two pairs of battens that continue forward of the front frame are tapered by thickness as well as by width. The other pair required less bending so they are only tapered width ways.

I tapered the thickness of the battens on the surface that will be inside the boat, this leaves the surface that will mate with the plywood skin as a smooth fair surface.

5 of the 6 battens have been re-sanded, as it's easier to do it now than when they are in place. The last one remains to be completed as rain eventually stopped play.

The front frame remains to be fitted.

But to look at the boat, it seems unchanged from before all this work.

Before I glue and screw the battens, I must remove many of the screws that attach the boat to the building frame as these will become unreachable once the battens are in place.

I will also coat all the bottoms of the frames with epoxy as these will be equally impossible to reach after the skin is in place.

Sunday, June 21, 2009

The weather cleared up

So I got out for another hour or two and finished off the notched on the other side. The transom notchs on the second side remain to be done, as do notched on the forward frame. They are only cut to half depth, as I need to taper the battens from the second frame forward to help them bend with the hull.

Then I need to sand the battens, dull the corners with a block plane, and screw em and glue em.

I thought it would take a couple of weekends to do all the notches, so I'm pretty pleased with the notch jig.

Saturday, June 20, 2009

The Jig Works....

After lots of advice and comments from the forums, I made up this

It rests on the chine and the keelson, so the angle of the notch is correct, even on the forward frames. I have to be careful not to lean on is or it will bend, but in practice that has not been a problem. There was a little tearout, but this is a boat, not an Heirloom Cabinet.

The first side went quite slowly, much of that was due to constantly measuring the notch I had just cut to make sure it fit perfectly. The second side should go more quickly.

The two battens, running fore and aft in the picture, that limit the movement of the router are 2 1/4 inches - the diameter of the router bit apart, this leaves a little wiggle room.


On the first side, I had hand cut the notches for the center batten, so I left the center batten in place to leave me with a shorter gap to bridge with the jig. Less flexing.

You may notice that this Jig is essentially the piece of ply I used to cut the slot for the centerboard as previously seen here

Sunday, June 14, 2009

Feckin Notches.....

So, the fabricated batten is done, and planed, and seems to be just fine. Time to start on fitting the battens.

There are 6 battens, and they have to be fitted at 4 frames, and the transom. That's 30 notches.

And the battens all have to be in the same plane. Right, no problem.

I started with by setting a marking gauge to the thickness of a straight beam, plus the batten. Then I placed the beam across the keelson and the chine, and marked the frames with the gauge. So far so good. Then it's a simple matter of running a saw across it a few times, and chipping out the waste with a chisel. Fine, except this is Oak, and Epoxy Soaked Ply, and did I mention there are 30 notches to cut.

I have one batten fitted all the way to the forward frame, at that point I need to taper the thickness so it will bend a little at the bow, but now I am thinking of how to speed up the show a little.

I'm thinking that if I get a Long straight router bit, and make up a guide that won't flex or bend, then if I set the bit depth to the thickness of the guide + my batten, I should be able to cut the notches in a morning. Of course, adding power tools does allow you to mess up faster 8-)

Friday, June 12, 2009

More Long Sticks

As I noted earlier one of my battens was too short and had a knot the size of a plum. With the advent of modern glues, this is only a minor setback.

I spent yesterday evening, cutting out the bad bits and adding an extra piece to scarf up a new longer batten.

Balcotan PU is perfect for scarfing Oak. I have cut and glued a few test pieces, and tested them to destruction, and I laminated up a curved batten which I simply left around the garden. A year or so out in the weather seems to have done it no harm.

My scarfing jig had a minor problem, in that the battens were too thick, and my Circular Saw only cut 90% of the way through. I finished the job by hand and then planed it all smooth.

Once the glue is set, I'll bend it into place with a few clamps and make sure it runs fair.

Tuesday, June 09, 2009

Beale Park Boat Show 2009

We went to the show, but the weather was unkind. I spent Friday at the show, and Saturday Evening. I met John (see post above) and just missed George D.

I took Sarah out for a sail on Character Boat's Post Boat which ghosted along in the lightest breeze, until the wind just gave up all together and we had to resort to the outboard (is it still an outboard when it's in a motor well ? It's sort of an inboard outboard then)

Some folks from Honor Marine were staying at the same B&B. It would be hard to find more helpful people. Sadly, their boats for the show were not in the water, I would have loved to see them under sail.

If I was not building my own boat at the moment I'd have been working hard to decide which one to bring home 8-)

The folks from Flints Marine Chandlers were there with a stand full of nice toys. I see some damage to my credit card in the near future.

Sunday we went to Lego Land with the little un's. Well worth a visit if you are down near Windsor with Kiddies. And in mediocre weather, the queues for the rides were tiny.

Sunday, May 31, 2009

Progress At Last.

The weather forecasters, clearly embarrassed by my last post, have conjured up a fantastic bank holiday weekend.

Genuine, original Blue Skies.

So I got to do a little work on the boat.


The last of the side panels is now in place, glued, screwed, and mostly trimmed.

The battens are now laid in place, and clamped. I did this partly to see how it looked, and partly to see if the battens I cut months ago were actually long enough.

The one on the far left is of course, too short, and had a knot the size of a plum about 1/3 of the way from the front. 

I see a bit of cutting and scarfing to make up a new batten. I have no more planks long enough to cut a new batten from a single piece.

Balcotan PU does a wonderful job of gluing oak, provided you have a perfect joint and lots of pressure.   

Sunday, May 17, 2009

Irish Sky Gray

If you look at the Microsoft colour tables for application developement it has colours like WhiteSmoke, and Wheat and Alice Blue. Charming names. 

But for Gray, they have DarkGray, LightGray, or DarkSlateGray not quite so imaginative.

Had they travelled to Ireland they could have had:
  • IrishDrabGray
  • IrishDrizzleGray
  • IrishDownpourGray
  • IrishIt'sBeenRainingForDaysGray
Or my personal favourite
  • IrishWhere'sTheFeckinSunGray?
Needless to say, progress on the boat has been slow.

I have however gotten very good as tying down the boat cover to avoid pools of water collecting in it. Practice makes perfect.

Sunday, May 10, 2009

A scarf in place

The weather forecast for the weekend was a very mixed bag, but as happens about seven times a week, the forecasters were just plain wrong.

It was beautiful today, so we did some family things involving water slides and screaming, and then I added one of the forward side panels.

It was scarfed in place on the frame.


Some deep jaw clamps, and a deck screw provided pressure along the scarf.


And this is what it looks like from the inside. The plastic is the remains of a ziploc bag over a block which crosses the glue line, there's a deck screw applying pressure. It's tough and epoxy will not stick to it. 


You may notice above a small piece of plywood clamped to the frame. This L shaped plywood and another make up a rest for the panel so that I can locate it properly with one pair of hands. 
Sarah is not yet old enough to draft in as an apprentice boat builder.

Broken drill bits.

Fuller Stepped Drill bits rock. You get to drill your counter sink, clearance hole and pilot hole all in one go. Nice. However, if you mistreat them, like for example, trying to bend them around corners because there's something in the way of the drill, they will snap off at the step and leave the part of the bit in the wood.

This is now a problem, as traditional methods for extracting broken screws don't work well on the hard metal in drill bits.

This combined clearance hole and countersink proves just the thing for removing broken drill bits. 

The broken bit was #8, so I got one of these counter sink/clearance hole drills in #10, took out the drill bit, put the outside part in a brace  and cored out around the broken bit enough to get a needle nose pliars in.

I'd strongly suggest a brace instead of a power drill. High speed metal spinning in the vicinity of stuck hardened metal seems like a really bad plan. 

Thursday, May 07, 2009

Pics

Here you can see the newly glued, screwed and trimmed panel in place.


And a closeup of the tapered ply, ready to be joined to the forward panel.


The front panel will simply be fitted to the scarf and trimmed to fit the chines and sheer, so the exact positioning of the aft panel is not critical.

I coated the edges with epoxy as my tarp cover is far from ideal, and I wanted to avoid soaking the end grain if waterlogged tarp ended up lying against it.

Wednesday, May 06, 2009

Some planking in place

I made quite a bit of progress over the weekend. I have the two aft side panels glued and screwed in place.

A simple piece of folded wire allows you to mark the position for the screw.


There is a screw every 3 inches on the chine and the sheer clamp, the aft panels are 8 foot long, and theres another 4 or 5 screws on the transom.
The works out about 70 3/4" bronze screws.

Fuller stepped drill bits all the way. They drill the pilot hole, the shank hole and the countersink all in one go. Use care, they are fragile at the step, and if you drop or abuse them they will likely snap.

I started out with a Yankee, but moved onto my Mikata 14.4 NiMh Drill/Driver for the second panel. Set at 5 on the clutch, it sank the screws just below the surface every time. That's part of what you pay for with a good tool. Consistancy.

I have trimmed one side back to the chine and transom, the other side is awaiting my attention. Trimming to the sheer clamps will wait until it's all flipped over.

The ends of both panels have scarfs cut into them, the forward panels have matching scarfs. The forward panels are trimmed after they are put in place, so lining things up is easy.

I'll need a few temporary blocks on the back of the scarf and a few temporary screws to put it together, thickened epoxy will do the rest.

Pictures will follow soon.

Monday, April 27, 2009

Or Scarfing....

Thanks to Jim Ledger from the Wooden Boat Forum for pointing out:
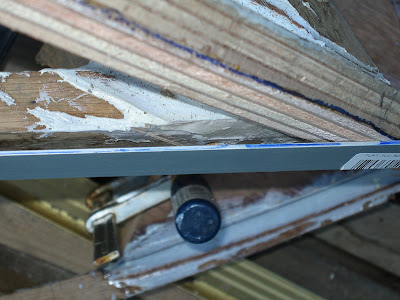
What about the plywood end grain in the butt? 
What about the flat spot in the panel where the thickness is doubled?
What about drainage on the bottom of the boat?
What about the ugly butt block showing on the interior?

And to kc8pql  for his comment:
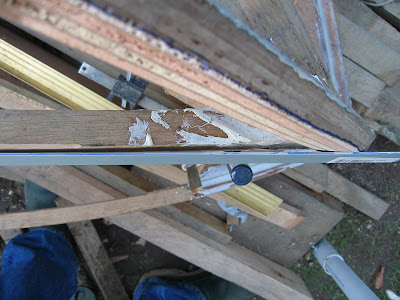
Suck it up and do proper scarfs. You've worked to long and hard to chicken out now.

So I tried scarfing, or at least, I've cut the scarfs. 

I just stacked the 2'x8' sheets of ply with each 2½ inches back from the next, then I ran a power plane down the steps. I had a scraficial peice above and below as I've read that the top and bottom ones don't turn out so well.

Now I have to either
  • Glue them and put them on the boat.  or
  • Put them on the boat and Glue them
Handling 8 foot parts seems easier, but I am concerned about how well I can join the scarf when the ply is sitting on a curve.

I'm leaning towards gluing them in the kitchen/dining room (only dry place that's long enough) overnight on a friday and fitting them on a Saturday.

Wish me luck.

Wednesday, April 22, 2009

Butt Blocks

I have after much consideration decided to use butt blocks.

My reasoning is that I can do the but blocks in place so 

  • I don't have to store the 16 foot scarfed panels
  • I can manage 8 foot panels all by myself without calling in help.
  • From other Builders work, butt blocks are indistinguishable from scarfs in the end product.
However, my smallest screws are 1/2 inch I suspect that they will just project through the two layers of 6mm ply. 

I think that judicious use of a file / dremel may resolve that little detail. 

"planking"

Can you really call it planking when you whack on great plywood panels ?

Regardless, the planking has started. Cutting a 4'x8' sheet of ply* into 2 2'x8' sheets is not trivial unless you happen to have a panel saw. 

To do it on a table saw, you really need extended rollers to allow you to control it. A typical circular saw is a little big and heavy for cutting 6mm ply.

So..... More Tools!!

I got an 18v trim saw. This one was a cheapo special, against my better judgement, but I reasoned that I'd only need to cut a few sheets, and I may never use it again. When will I learn ? The Battery won't hold a charge overnight, but freshly charged it's not bad. 

To avoid massive breakout on the ply, I make the first cut about 3mm deep, half way through the plywood. This means the blade is exiting the wood moving forward rather than up. The plywood is supported by the wood in front of it, no breakout. Then I follow the same cut with the blade just through the wood. This is easier that you might think. The saw is small and easy to control with one hand.

The result, at the cost of a little extra work, is a nice clean cut.

So I now have the first two panels clamped into place on the frame.  The fit looks really good. Of course these are the aft panels. It's the fit at the pointy end that's difficult.

(*2440mm X 1220mm doesn't metric make things easier?) 

A sense of Urgency

We are bringing forward the building of an extension onto our house.

Unfortunately, where the boat is now sitting is about where the new dining room window will be. 

So I need to get the boat to the stage where I can flip it.

I'm guessing that if I finish the ply skin and then glass the hull, I can flip it and move it. Later I'll need to flip it again to paint it, but I can live with that. 

I need to think about how I will support it when I flip back it for painting, or I suppose I could tilt it up at 60deg and paint one side, then go around the other side and do the same.

If I go to flip it back over for painting, should I wait to put on the deck until I've righted it ? Or will the deck give it better rigidity to avoid damage in the flipping ?

It's a Glen L 14, so the extra work in flipping it twice is not a show stopper.

Anything I should know before I embark on this course of action ?

Monday, April 20, 2009

ToDo List

  • Cut & fit Plywood Skin
    • 4 panels
    • 2 of 2x16 foot, 2 of 3 x 16 foot - I have to scarf join 8 foot boards.
    • Fit transition joints
    • Glue & Screw into place
  • Putty the screws.
  • Fair Hull.
  • Epoxy glass the Skin.
  • Paint it.
  • Flip it,
  • Some internal framing 2 x 9' x 3 inches each side.
  • Blocks for the coming (I want to round it at the front, even though the design is simply square.)
  • Paint inside
  • Seats + Varnish or Deck Oil
  • floorboards + Varnish or Deck Oil
  • Plywood deck
  • Coamings
  • Mast Step.
  • Paint deck.
  • Make up mast & boom, including sail track in mast & sheave for Mainsheet Halyard.
  • Varnish mast & boom
  • Fit mast hardware.
  • Make up rigging.
  • Make up centerboard, glass
  • Make up rudder, glass, paint.
  • Attach cleats, blocks, fairleads, rigging, sail tracks.
  • Carve name plates.
I suspect I should be done by Saturday June 6th 2015 
;-)


Sunday, April 19, 2009

Fair Enough....

The laminates worked just fine, it's more or less ready for the plywood skin to be attached.

I can see a few places where the thickened epoxy may go on a little thicker. But in general it looks good.

Given that it's a family dinghey with a hull speed of 5 knots, and I'm not likely to be out in weather where it might get up on a plane* I think it's fair enough.

*Has anyone ever got a Glen l 14/15 on a plane?

Tuesday, April 14, 2009

Detailed Bevelator Pictures


I cut some wooden blocks to just fit inbetween the vertical guides.


 I drilled a hole for the bolt - this needs to be very precise. 


When the wood is bolted very tightly in place, you put the whole lot down on a flat surface, and screw in the aluminium strip. I've shown the result here. You need to do it in place to get it any way accurate.


You can see a small gap on the right of the strip - the plastic guides on the planer sit there.

This is accurate to about 1°

Sunday, April 12, 2009

Bevelator 1000 Pictures and Update

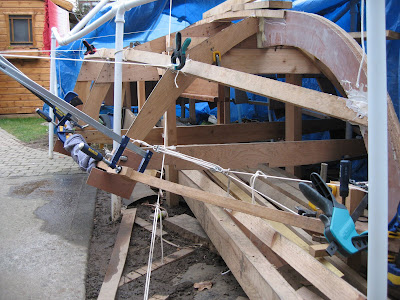
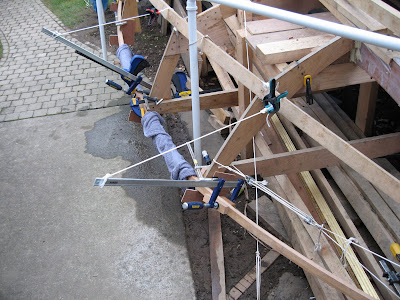
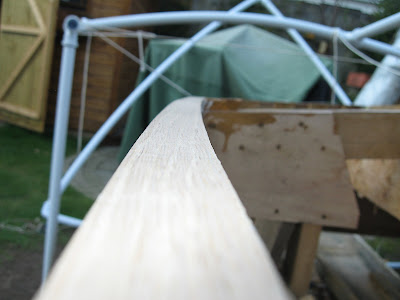
The laminations on the chine are in place, I will leave them till at least tomorrow to completely dry. Then I will mark the fair curve and trim away. I set up a batten to follow a fair curve, and all seems well.

I finished the heavy work on the second chine, and on the keel using the Bevelator 1000, shown here. As I described before, I've bolted an aluminium strip to the side of the planer. The strip rests on edge against the chine when you are doing the keel, and vise versa. 

This really does make light work of fairing the chines and the keel. It is not perfect, but it gets you into the ball park real quick. A little work with a Jack plane will finish the job now that the bulk of the wood has been removed. It's only off by about 1°.

The shop vac makes life a lot easier. There's about 2 buckets of shvings that are Not all over the garden. The Bosch in the picture has a switch so that it can take a vacuum on either side. That makes all the difference in the world. 

Oh yes, the planer goes through bronze screws just the same as Oak, there's not even any different sound (at least none I can hear over the shop vac, and while wearing ear muffs)

Thursday, April 09, 2009

Laminations

So, last night, under the glare of a 500 watt site light, I added the two laminations to my chine. I used microfibres with the epoxy this time.

I think they will be better as a glue, fiberous and all that.

I see some careful consideration as I mark up the curve that I want to fair the lamination too. Some serious thinking, measureing, holding plywood in place to see how it will all fit together.

Given the surface area available to glue these things up, and given that the oak should all expand and contract in the same direction, I have no fears regarding Oak & Epoxy.

Time I guess will tell.

Monday, April 06, 2009

Thanks Harvey

Just a quick note say Thanks Harvey.

The band saw made life easy for cutting 3/8" thick laminates from 2" Oak stock.

I replaced the rubber drive band, and the old blade, and added a new fence, total cost, a whole lot less than a new band saw.

It's such an innocuous machine, hardly as noisy as the Shop Vac when it's just running.

(For everyone else, Harvey had an old Band Saw in his workshop that he donated to my boat project)

Next I'll glue the laminates into place to build up the chine near the bow, and then use a batten above and below the chine to mark out a fair curve. A little work with a power plane, followed by a long sanding board and I should be back in business.

Thursday, April 02, 2009

That was a PITA

First, I will refer to a previous post boats-are-easier-than-carpets

I decided that it would be better to remove the first laminate, and replace it with a correctly sized one, rather than try to just add more laminates and fair them down.

There is a concern that White Oak does not Glue up well with Epoxy.

I am no longer concerned about this. My Epoxy glues my White Oak just fine.

The only way to remove the laminate turned out to be cross cutting it down to the glue line every 1/2 inch or so, and chipping it out with a chisel, just like cutting a housing for a lap joint.

Even doing this, in most places the wood did not come off at the glue line, A sander with 80 grit will tidy up the mess this weekend.

I used some scrap ply to see how much extra material I need on the chine to ensure that the side and bottom planking meet at most at a 180 degree angle. It's about 5/8"

At least I think know what I need to do now.

I suspect some more time in the Thinking Chair before I set to it.

Monday, March 30, 2009

This is not good.....


Even with my lamination, my chine is too far inboard. It's not a great picture, but that grey thing is a straight edge running from the stem to the sheer strake. I have and bevelled the stem and started bevelling the sheer strake. The straight edge is sitting on part of the sheer that will be faired away. But not much. Even when I finish fairing the sheer, the chine will still sit inboard of the straight edge.

I think my lamination was too sharply tapered. I will either add another lamination, or more likely plane it back and add a single less tapered one. I suspect I'll build it up with ply tacking into place first to see exactly how much I need to build up.

Tuesday, March 24, 2009

Bevels R Us


I really should have taken a picture, but this should give you the general idea.

An aluminium strip is bolted to the side of the planer (there's a hole for bolting on a parallel guide).

The strip is edge down.

You alternately plane the chine and the keel, with the edge resting on the other. Take off a bit at a time and voila.

Dave
Posted by Picasa

Sunday, March 22, 2009

Good, and not so good

Fairing is going well now that I have moved up to using a power plane. I have bolted a strip of aluminium to the side - it's edge facing downwards. It rests on the keel while I plan the chine and vise versa.

The results are ok. I'll tidy up with a Stanley #4 Bailey.


If only it were all that good.

I was a little premature in my self congratulation over the nice joint between the chine and the stem. I still contend that the joint it very nice, it's just in the wrong place.

Now that I've started fairing, I can see that it's joined to the stem too far back.


My first thought was to trim the stem back to the chine, but on reflection that would change the entire profile of the stem, and I am not sure it would change it in a good way.

I see 2 oak battens about 3/8" thick at one end, tapering to nothing, laminated in place from the stem to about the first frame.

Wish me luck.

Monday, March 16, 2009

Fair Enough

It was a good weekend. We brought the little un's to see a new foal, and to see a Japanese Garden. Stepping stones are a wonderous thing when you are 2½.

I even got to work on the boat. The last sheer strake is now glued and screwed. Incidently you can strip bronze headded screws with a Yankee Screwdriver. You just have to try hard enough. Luckily the screw is exactly where it needs to be. 8-)

I spent a lot of time Sharpening and Honing and Polishing various chisels and planes, so I started fairing the chine log with my Stanley #4 and a truely razor sharp Hock blade. 

There were a few reasons for starting with hand tools.
  • You get a feel for the job without messing it up in one fell swoop.
  • Shavings are less annoying than saw dust when there's clothes drying on the line
  • The sound of a sharp blade shaving oak is quite pleasant, a power planer is hardly musical.
  • It's interesting to try it.
One piece of advice, never arm wrestle with a carpenter who uses hand tools.

I suspect that I will move on to power tools for the bulk of the work, as I suspect that it would take many weekends of collecting shavings to make a dent in the work that must be done.

Photos will follow soon.

Wednesday, March 11, 2009

In the Dark

It was a lovely day for backyard boat building yesterday, not cold, not raining, not even windy. But I was in work. So I get home, have dinner, entertain the little uns until it's bedtime, and then it's Dark.

But I really wanted to take out the deck screws and replace them with bronze ones on the sheer strake. 

So out with the cheapo site light. 500 watts of halogen illumination, and we are golden.

I have decided that I like my Stanley Yankee for bronze screws. It's slower than a power driver, until you factor in the sheer grief of stripping the screw heads, or just plain sheering off the top of the screw. The Yankee just does not do this.

Next job, this weekend hopefully, is the other sheer.

Monday, March 09, 2009

It snowed. It's march fer feck's sake...

I had great plans for Sunday.

Then it snowed*. It's march fer feck's sake...

What else can I say, except it would be nice to be building indoors.

*Ok, Mostly it just rained, but it did snow for a little bit.

Friday, February 27, 2009

Polite Rain

In a shop, it's polite to wait until someone finishes a difficult glue up or stops playing with the sharp spinny thing before you interrupt. So I was grateful that the weather showed the same good manners.

I had just finished gluing up the port side (I refer to port and starboard as if I were sitting upside down in the boat, since it is currently upside down. This seems more correct. For absolute Clarity the port side is the side facing out into the garden in the photos) anyhow, as I was saying, I had just glued up the Sheer Clamp, all held in place with waxed deck screws and large washers. I was crouched in the gap between the bushes and the boat, just about to start drilling the holes for the starboard side when I felt a few drops of rain, then a few more, and like Cockroaches and Politicians, where there are one or two, there are always many many more.

Tarpaulin up, tools away and back inside for a hot shower. All the while thanking the polite rain for not disturbing me halfway through the port side, and for not letting me get well started on the starboard.

Incidentally, one very handy tool for boat back garden building is a Garden Kneeling Pad. Basically a piece of durable foam with a built in handle that's just right for kneeling on. Kneel in the cold wet mud, or hard concrete for a while and trimming those last two notches is a whole lot less fun. Get one for feck all + postage on ebay.

Sunday, February 22, 2009

Looks like a Boat


Here you can see it's starting to come together. Both of the sheer clamps are fully fitted, Next is the glue up. The eagle eyed amongst you will notice that the frame for the cover is inside the chine between the first and second frames (from the pointy end). This will require some "rework" on my canopy frame.

As I mentioned before, twisting oak requires a little bit of leverage. I've swapped in the shorter clamps as the wood has already taken on a fair twist from when I steamed it. This helps keep it all in place until I can get the Screws and Glue in place.

And the pointy bit. The tape is to stop water getting in before I glue it up. 2 inch screws and big washers hold it all in place.  A nice fit if I do say so myself.

Monday, February 16, 2009

A little more progress....

The sheer strake notches for the "other" side of the boat are finally cut. The "other" side is of course the side beside the wall. And the Bushes. I think in hindsight that another 6 inches away from the wall would have made a lot of difference. 8-(

I can see the problem when I get to glassing and painting. It will require some "gentle" trimming of the bushes. My wife may not be happy.

It appears that the best way to actually attach the strake is to glue and screw it on at the front first, and then bend it into position. This way leverage works in your favour. In the absence of any friends who would be prepared to simply stand still, holding the end of a 16 foot "stick" for half an hour or so, I ended up just tying it off at the centre and the far end. This, after a little bit of adjusting (ok, a lot of adjusting) held the near end in place for me to drill and screw. I wish I had pictures, but by the time I was finished, It was dark, and I was tired and there was kids (and wives) to be fed.

Fuller bits rock, but they are fragile. Fortunately the one that snapped off had gone in far enough to protrude out the far side, making removing the broken bit a whole lot easier. You can't really leave the broken bit in. Steel and Oak are poor bedfellows. Acid and all that. It was (of course) my fault that it snapped, trying to squeeze the drill in where it just won't fit means it puts a whole lot of bending force on the drill bit. That only ever ends one way.

Next up is the glue up. Then the fairing, then I start with the skin....

Sunday, February 01, 2009

Sheer Strake Notches

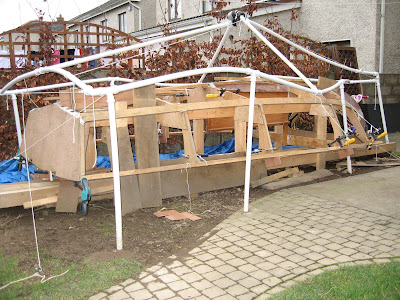
Trying to fit the sheer strake (blue) when the frame us upside down, and it's colder than a Snowman's toes can be fun. Working upside down is just hard work. A simple template (in red) helps get things lined up. 

This is just cut from a scrap of wood, ply is fine. And it quickly allows you to see how much you need to increase your notch by to have the outside corner of the sheer strake at the correct height.

If you think my diagram is a bit rough, you should see the joint. But it will be hidden away, epoxy fills all known gaps.... 8-)


Tuesday, January 27, 2009

Wooden it be nice....

Wooden it be nice to work on my boat.

I got all dressed down in my old clothes and overalls, unwrapped the boat.

I took out a few saws and markers to have a go at some of the remaining sheer strake notches.

Then I noticed a small spot on my glasses. The another. Then I felt one on my nose.
I could suddenly hear the pitter patter of tiny rain drops on the Poly Tarp.

Just like that, overcast became raining, and I had to cover over the boat and gear down.

Building a boat outdoors is a nice idea. But Rain is a dismal reality.

Oh well there's always next week.

Work has deadlines, My Maths degree has deadlines, The boat will just get done.

At least the hired help still shows up on time....

Monday, January 12, 2009

PMF 180 Rocks

In spite of dire weather forecasts, I got to spend an afternoon on the boat this weekend.

I added the twist to the second sheer strake. More cord, more truckers hitches and more clamps.

Then I started cutting the notches for the first sheer strake.

I really didn't fancy trying to chisel upwards, so I got out a blue marker pen, marked off the run of the sheer strake at each frame and then got out a mirror and the PMF 180.

It Rocks. It's not a precision instrument. This is not the thing to used for visible dovetails. But to cut a notch for sheer strake that will be epoxied and screwed into place, happy days.

You can set the blade at any angle to make it easier to get at things. It's noisy though, even through ear muffs.

I got all bar one frames sorted on the first side. Next weekend should see both sheer strakes ready to be glued and screwed into place.

Decking screws to draw it all tight and to be replaced by bronze later.

Saturday, January 03, 2009

Sheer Madness

I decided to go with simple L shaped brackets to help me get the sheer strakes into place. Two minutes with a hand saw and some scrap ply and I had 10 L shaped pieces.
Once they were clamped in place, it gave the sheers something to rest on while I clamped it all up. You can see these more clearly in the second picture.

Now that they are steamed into place, and with the help of towels, boiling water, clamps and a truckers hitch, I am twisting them  a little to follow the line of the frames. To avoid the clamps damaging the sheer strakes, I clamped a cutoff either side and then twisted. With the leverage of the long bar clamps, and the 3:1 advantage of the truckers hitch (poor mans pulley) you do have to go slowly and carefully to avoid that snapping sound. I hate that snapping sound.

It's really starting to look like a boat now. I can see the shape of it.

I need to bevel each of the notches and then glue and screw. I have a Bosch PMF 180 (Fein multimaster clone) and it happily cuts oak. I suspect this will be easier than trying to lie under the frame and hit a chisel upwards.