Since we've had about a month of snow, and I'm pretty much working outdoors, and since My Family and I got nailed by a nasty flu over Christmas, there's been the some total of very little progress.
I did get to do some reading, and I can recommend Something About Navigator or you can get it at Amazon.com Albeit the first chapter or two are a bit over the top. Think love struck teenager & rose colored glasses. After that, it settles down to sailing experiences and building experiences. Well worth buying.
Wednesday, December 29, 2010
Auto-release cleat angles

You can see here a very rough and ready decomposition of the forces (in blue arrows)on the auto-release cleat. I've split the force into the part acting towards the pivot, and the force acting around the pivot. What's important is the force acting in rotation around the pivot.
As you can see, if the line comes up to the cleat, the force available to pop the cleat open is much reduced. If the line comes down to the cleat, then you will end up with an auto-release cleat that may pop much more easily than you expect. A little trial and error goes a long long way.
Thursday, November 25, 2010
Kick up Rudder
 First, please forgive the paintwork. It was not right, so it needed sanding back, and it will need another coat or two.
Note the uphaul has a 3 part tackle to overcome the mechanical disadvantage of pulling up the rudder from the top.
I need to sort out a latch for the downhaul. I tried one of the camcleats that pops open, but with nylon cord, the cord just stretches. Once I get some proper 4mm polyester I'll try again. I may have to file down the lugs on the pop cleat a little to make it easier to break out.
But it may simply be the lead of the line. I may need to change that a little. If you come "up" to a pop cleat (or down if you set it on the underside of a tiller), you reduce the perpendicular distance to the axle. This hugely increases the force that you need to pop it.

My centerboard is complete, it simply needs another coat or two of paint and I can install that too.
Next the mast.

Sunday, October 17, 2010
Stoopid is as stoopid doesn't pay attention
So I was ripping a 20 foot sitka spruce plank to size for my mast. I set up things as usual, put the wood up on scrap pieces of wood, on top of metal stands.
The trick is to set the saw blade to cut the spruce, and cut a little into the scrap, but not all the way through to the metal stands.
I remember thinking ah these glasses will do, then changing my mind and putting on my safety glasses.
So I started the rip cut, and then there was a sudden unpleasant noise, kind of like the teeth on a carbide tipped wood blade shattering as they lost the battle against the metal stand. (The metal stand didn't come out looking pretty either)
I'd forgotten to set the depth of cut.
Total damage was one carbide blade, a damaged stand, and a few cut's on my hand where bit's of carbide had made passing glances.
Could have been worse.
The glasses were un-marked. But it did serve as a reminder that they are not optional when working with things that spin in the thousands of rpm.
Saturday, September 04, 2010
Lead Pour
I spent a long time worrying about the lead sink weight for the Centerboard. I needed about 30 sq inches of the CB to be cut out and replaced with Lead. And I was a bit concerned about the strength of the remaining plywood with such a big hole. Of course it's much smaller than it sounds. 10" long, 3" wide parallel to the leading edge, leave 13" of 3/4" ply. Add Epoxy Glass and you have no worries about being strong.
I rounded off the corners with a hole cutter to avoid stress points.
I got a cheap, flat, propane camping stove. The cute tall ones are way too unstable for supporting 12 lbs of lead.
A big thanks to Nick who did video, offered encouragement, and stood by the fire extinguisher.
I had a moment of panic at the start when I though the bubbling sound coming off the lead was lead dripping out the bottom onto the ground.
The wood out gasses a lot and this gives you quite a bit of lead splatter. Short sleeves at your own risk.
I should have been more careful levelling the board before the pour. It was only slightly of, but there's a bulge at one end of the sink weight.
There are two big holes in what was the bottom of the lead pout, probably caused by out gassing of the plywood base.
All in all it worked out well. I've some cleanup work to do with a sharp plane, but nothing major.
Tuesday, August 24, 2010
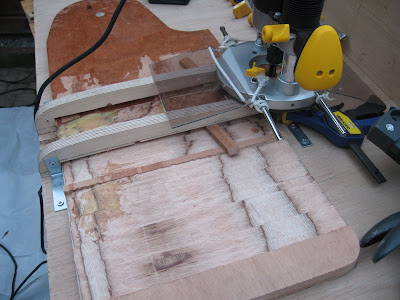
The Rudder

Or at least part of it. The blade shown here will be pinned through the shoulders to provide a kick up rudder. It will have a down haul to a break away cleat, and an up haul to let me pull it up Before I hit things.
As you can see, I have switched to foam rollers, and there's no shaggy dog hairs all over it.
This coat is still wet, but the finish is about that glossy when it dries.
I have also found that a touch of thinner extends the drying time and makes the paint a lot easier to work with. It seems the that depending on conditions you need more or less thinner, so the paint starts out without enough, so that you can always add more.

I presume a "shop" would value quick drying more than I do, and would have more experience working with the paint, so they could better cope with it drying as they paint it on. Shame it will have to go into the water. By the way, it's not lying on the plastic, there little scraps of ply with screws sticking through them, the rudders is resting on the points of the screws.
Thursday, August 19, 2010
Credit where credit is due
There's an old tradesman's saying "do a great job, the customer will tell his friends, mess up and he'll tell everyone"
It's rather unfair.
To address the asymmetry of it all, allow me to heap praise where it's very definitely due.
They have been helpful, even though I am a tiny customer. They have been knowledgeable, and when I had a small problem, they went far above and beyond the call of duty to resolve it.
I can whole heartedly recommend them. I have gotten Plywood, Oak, Sapelle, and Sitka Spruce from them, shipped to Ireland.
If you are looking for boat building timber, give them a shout or an email.
I am one very happy customer, and I thought I'd tell everyone.
Monday, August 16, 2010
This painting lark
So I reckoned I'd try to paint the rudder as a learning exercise in painting.
- Cheap rollers loose tiny fine hairs like a stray dog in the summer. The hairs don't show up in the undercoat, just the gloss.
- High Gloss Paint shows surface defects or blemishes as well as a High Power Magnifying glass.
- You will use WAY more paint that you imagine until you start to get the hang of what you are doing. (For use, you can read waste)
- You will probably have to sand back the first thing you paint to the wood.
- If you could make a vacuum cleaner that attracted dust like wet paint, Dyson would be out of business.
- If the paint is too thick, it will not dry. The surface will, but under that will be a layer of soft sticky paint waiting to get out. Too thick is not all that thick at all. Several thin layers are better than one gloopy thick one.
- Once you take off your gloves, you will discover that the thing you have just picked up is covered in wet paint.
Sorry no photos, though I may post them up on www.Wictionary.com under abysmal.
Monday, August 09, 2010
Get the Lead Out
My second try at a rudder was a big improvement. It's amazing how the details matter, if you put too much pressure on a wedge on one side, then you cut a little deeper with the router. More sanding to do later.
The blade is now glassed, and I'm adding a few extra coats of epoxy. The rest of the rudder assembly is under-coated. This will be my first chance to see how the Paint turns out.
Since the center board is next, I did a trial pour of a lead sink weight. I cut a 1 1/2" hole in 3/4" inch ply, and clamped a backing board with a thin sheet of metal (from the base of a biscuit tin) behind the hole. I melted the lead shot in a cheap saucepan bought for the job. I wore a leather welders apron, leather gloves and a full face shield.
A simple propane camping gas hob easily melted the shot, and the pour went very easily. A bit of an anticlimax. (that's not a bad thing when you are playing with molten lead)
Since I was just running a test, I did not bevel the hole for the lead, and indeed, it shrank as it cooled, and then later simply fell out.
The other thing that I learned was that the metal sheet, aimed at giving me a flat base on the lead, failed miserably. The back of the lead was concave. I guess the metal was too thin, or perhaps the plating on the metal off gassed as the lead was setting. There's some evidence of bubbles. Given a tin plating on the metal from the biscuit tin, that's my best guess right now.
Sunday, August 01, 2010
Trailer
I had to "nip over" to my Sister's house to pick up my Sitka Spruce for my mast, they had been minding it for me. (Thanks Lisa & Peter).
The simplest way to do this was of course to run over with the trailer, it has a mast crutch and all.
Having never driven with a trailer, this 45 minute drive (which became an hour, I travelled quite sedately) was far easier than I had expected. My neighbour had to show me how to use the tow hitch (Yes, did feel quite stupid when he showed my what I was doing wrong)
During the drive, I had flicked the rear view mirror to dim as some clown had his main beams on, then later I looked back and could not see the mast. A quick moment of terror as I imagined the damage 20' lengths of spruce could do on the motorway, was quickly relieved when I reset the rear view mirror.
Oh yes, when you are driving with a trailer for the first time, remember that you need to allow a lot more room when changing lanes!
Opps
So I followed the basic idea here http://www.duckworksmagazine.com/09/howto/foils/index.htm to make up my rudder. I thought that I'd have to throw out the first attempt, and then use the second one.
I guess the production run will be better !
As it happened it turned out quite well, the second side was clearly better than the first. I was actually considering using it, until I realised that I'd put the leading edge on the wrong side, and since it is a kick-up rudder, it's not even close to symmetrical. Oh well, you learn.
Things I did learn,
- on the first side you must leave pillars to support it when you flip over to do the second side.
- mill the foil shape from an over long rectangle leaving the ends untouched, then cut the rudder out afterwards.
- small wooden wedges keep the stock hard against the base and give more consistent results.
- two small pieces of perspex set up on a cord hinge run along the rails, avoid bits being kicked everywhere
- cut towards ourself, the sawdust shoots down the channel between the guides to your waiting hoover.
- Make sure the wood is the right way round.
I guess the production run will be better !
Tuesday, July 06, 2010
Steering a course
I've temporarily bolted on the Gudgeons, I'll take them off again to epoxy the holes, and for painting. But I need the Gudgeons for 2 reasons.
1) I will need to go fetch my mast, so I will need the trailer lights mounted, which will mount onto the Gudgeons.
2) I wanted to make up a test rudder.
I was in two minds about a kickup rudder, see the diagram at the bottom of this Glen-l Letter page. And I want to test out my planned method for creating the foil. Both begged for 2nd rate plywood rather than the expensive stuff.
I drew and cut the rudder as shown in the Glen-l Letter, and then made up the cheeks with 6mm ply. I used a large bolt for the pivot. All went very well. I think I'll laminate up 2 x 6mm ply for the cheeks of the final rudder.
So then I went on to the rudder release.... If I hit the bottom I don't want stuff to break, so I tried out one of the Auto-Release Cleats from Duckworks. See http://www.duckworksbbs.com/hardware/cleats/sd002570/index.htm
Be warned, the angle of the lead makes all the difference in the world to how hard it is to pop the cleat. Since my clear was on the cheeks, and the line lead to the rudder, 6mm or so "lower". The line lead "up" to the cleat.
A quick decomposition of vectors later with a pen an paper confirmed that if you lead "up" to the cleat from below, it simply won't pop open, it's not the fault of the design, simply basic geometry. Smacking the rudder off the ground to simulate hitting an underwater obstacle simply dented my rudder (this is a mock up - so that was no big deal.)
I tried a simple sacrificial wooden pin (a disposable chop stick) and I got much better results, but it would be impossible to clean out the broken "pin" and replace it under way. So I need to experiment with the auto-release again, now that I understand why it did not open. (Yes, I had it set to the minimum resistance setting)
D
Monday, May 24, 2010
It all slots together

There are two pairs of cleats on the frames, and matching cleats on the bottom of the floorboards, so when you drop the floorboards down they have to locate properly and it all ends up like this
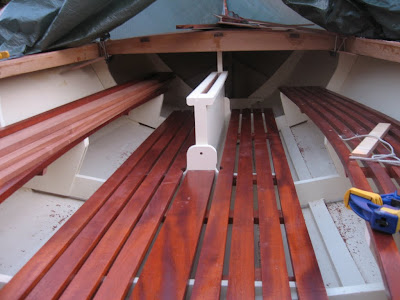
If you look at the cross piece on the underside of the floorboards in the top picture, you see it extends beyond the slats, this runs under the centre floorboard which is fixed in place, and helps hold things together.
The boards on each side can then be lifted out by raising the outboard side.
Easier, simpler, and cheaper than stainless steel hinges.
I think a bit of cord and some simple wooden Jam Cleats on the frames should hold them in place. The cord can simply be doubled through a pair of holes in the locating cleats on the bottom of the floorboards. Unobtrusive, cheap, simple.
I really should give things a wipe over before taking photos....
Monday, May 17, 2010
And somewhere to stand

The floorboards are made up of the centre which will be fixed, and the two sides, which which are removeable.
The battens which join the four slats on each side extend under the centre peice to fix them down.
A small batten at each end locates the side forward and aft. And some angled blocks (yet to be added) will locate the floorboards to prevent them sliding side to side.
They are sanded screwed together above, I have to take them apart and add a drop of glue, and then oil them when they are dry.
I'll have either turn buttons, or simple cords to hold the floorboards down on the outsides.
Wednesday, April 28, 2010
Seats
 And now there's somewhere to sit. The seats are 6 by 1 ¼ inch wide slats of Sapele, given 4 good coats of garden furniture oil.
I'm putting cross braces underneath the slats half way between each pair of frames. This means the 6 slats move together. I makes them much stronger.
Saturday, April 24, 2010
Is that sharp enough
 I've got most of the slated seats done. I'd have them finished tonight only it's raining, so I'm here typing. And I've started on the coamings. Since I've only just enough wood, I am being kind of careful not to cut anything too short. Given the complex joins, with compound angles, I cut the first one 1/8" too long on purpose, intending to sneak up on it with a plane.
Damn, end grain in Sapele is as hard as a Hamiltonian Path. (really hard)
I think it was Lincoln who said "If I had six hours to chop down a tree, I'd spend the first four hours sharpening the axe", well I sharpened my little low angle block plane till it could do this to the end grain.
Good man Lincoln, with sense like that, he should have been let run the county.
The obligatory birds mouth test
 I'm still thinking of doing a hollow mast. I made up a quick jig on an 18v hand saw to cut the groove in a single batten, then I cut this into 8 pieces.
Even with this rough and ready attempt, it came out rather well. Go to Duckworks website and search for Birdsmouth. They have LOTS.
I penciled in the outline of the joints, othersiwe you could hardly see them.
Sunday, April 11, 2010
Introducing the Lady Caroline

Now that the deck is glued into place, and trimmed, I can see what The Lady Caroline will look like.
I've just started the seats. I have some filling over the screws & sanding to do on the deck.
It's all coming together.
In other news, my Mom recycled an Old Leather Sofa. I acquired large amounts of the leather. And a short strip of it made a nice strop. Turns out that a scrap of leather with some polishing compound on a backing of birch ply will sharpen up a blade just fine. The more I practice sharpening tools, the more I wonder what all the fuss is about.
Tuesday, April 06, 2010
The deck is attached.
The entire deck is now glued and screwed in place. It started raining about 10 minutes after I'd finished the aft panel. That could have been a small disaster if the rain has arrived 30 minutes earlier.
I see a router and an edge trim bit in my near future to trim back the over hang on the deck.
I've started work on the seats. The slats look really nice with the deck oil on them. I just broke the corners with sand paper. The wood has a wavy grain, back and forth a few mm every few feet. Fine in terms of the strength of the slats, but running a block plane along the edge is a disaster. 18" of slicing through the grain followed by lifting a chunk.
To bend the slats into place, I've clamped a block to the outside of the seat supports, and reversed a few QuickClamps to make pushers out of them. An extra one vertically placed at each end keeps things from springing loose.
I've just sanded and oiled two slats so far to see how it goes, now I need a more efficient way of doing the remaining 12 for the seats, and 9 for the floor.
Wednesday, March 24, 2010
A picture during the day
 I took Wednesday off to do some family stuff, but I still had time for a little boat work when the littlest one was asleep.
I've rough cut all the panels for the deck. They are all epoxies on one side, the other sides next on the list.
Then I start to glue & screw it down.
You can see the slats for the seats sitting in the boat.
Sorry it's a little... untidy. My workshop consists of two D&B workbenches side by side.
Sunday, March 21, 2010
Today I started the deck...
I have already rough cut the 5 pieces that will make up the deck. But now the framing is completed, screwed, glued and dried.
So I've finally started work on the deck proper.
I've cut the backing blocks for the butt joints.
All the main pieces are rough cut and I've gotten one side of each soaked in epoxy. (much easier to do now rather than climbing inside later.)
I've started screwing the fore deck in place and laying out the remaining part to mark them up.
I really feels like I may have a boat soon.
D
Monday, March 08, 2010
Oak is sharp !
The deck framing is now almost complete. I've one or two dovetails to cut, and I've almost all the fairing done.
One thing that I learned is that white oak chines, when planed, can be sharp enough to remove chunks of skin. You always remember not to have a hand in front of a blade, in case the blade slips. But I forgot that a 60° oak edge is just as much a blade to the soft skin on the side of your hands.
To avoid anyone unnecessarily setting up a "Save Dave" web site, and associated charities to pay my hospital bills, I should say that my hands are still fully functioning, the missing skin didn't require any more than a plaster.
One other thing that I spotted is that before I screw in the last few pieces, It will be a lot easier to measure and mark the coamings. I can cut them to roughly fit, and mark them exactly in place. If I screw and glue the remaining pieces first, then I won't have that option.
All going well, I'll get the coamings and other details sorted this week during the evenings, and start the deck next weekend.
Tuesday, March 02, 2010
That bit looks big enough
So I wandered out to the boat last night after the munchkins went to bed, and I spent a while looking at the place where a cross member needed to go, and trying to figure out if I could laminate up a piece, since I didn't appear to have a piece big enough. I wanted to avoid another long trip to get one plank, when I noticed a piece that I'd tucked away under the boat a while back.....
Looks just about right, hold it in place, clamp a few bits in place, mark it up, double check everything (all under a battery powered florescent inspection lamp and a head torch) and whip out my Pull Saw. I can now cut compound bevels to a line as accurately as I can see. You got to love pull saws.
(I came across a small article in a magazine a while back about cutting a starting notch for the saw with a stanley knife. Make it 1/4" deep by paring the waste side down, and you have a perfect guide to start the cut.)
I can't fire up power tools late at night, the neighbours would (quite reasonably) be peeved, but no-one seems to mind the nutter with the hand saw and the head torch.
Anyhow, in an hour or so, I went from planing to spend an hour on Saturday cutting and laminating a piece to simply having it cut to length and fitted.
I've marked off the curve for the top of the piece too. I'll run it through the band saw later this week.
I can run the band saw after dark, it barely makes any noise as it slices through 1" of white oak... which is kind of scary in a way. At least a table saw screams a dire warning that's pretty hard to ignore. The band saw just quietly cuts through pretty much anything.
Sunday, February 14, 2010
Can we go sailing now daddy?
 "Is it finished yet?"
"Daddy, when can we go sailing?"
"Can we go sailing tomorrow?"
"When can we go sailing?"
And the winning question from my 3 year old daughter....
"Will I be older then?"
The Cut.....

So I have 2 pieces of oak, 3" x 1" x 10' for the Carlings. (good luck finding that on Google without coming up with larger, or sports - try "Carling and Deck)
All I have to do it cut them to fit.
At each end, there's a compound bevel. And the wood curves along the length of the boat. So if you don't take account of the curve, it will end up short.
You can see here how you cut the angle to get the length right.
I was accurate to about 1/10" over 9 foot on one side, and a snug fit on the other.
Measuring and marking the wood in place, if you can, it easily the most accurate, and least error prone way of doing things.
Friday, February 12, 2010
Making Sawdust....
The last consignment of wood arrived yesterday, so I took a days holidays to.... get the wood tidied away out of the house.... yes. Get it Tidied....
I have a cheapo shop vac that I can connect up to the power tools, after ripping various oak and mahogany planks into over 20 1", 2", 3" and 4" wide slats, each over 9' long, I had enough sawdust to fill a large kitchen bin.
I now have all the wood I need to finish the boat. All I need now is time and good weather.
I now have to round the edges of over 400 feet of wood. And then Oil it all.
I'm going with deck oil rather than varnish. It's more continuous maintenance, but the maintenance is a lot easier. Just rub in more oil. No Sanding, stripping back to the wood. Just rub in more oil every 6 months and you're done.
D
Monday, February 08, 2010
A weekend of progress...
I got out my Bevelator 1000 again. This time to bevel the sheer clamps where the deck will go on. I also cut 2 of the three beams that will sit under the foredeck.
The remaining wood arrives over the next week or so. So I should have a deck on the boat in the next 3 weeks.
Then it's the seats & floors.
I found this for making up foils. Nearly as good as a 3d Cad system.
Monday, January 18, 2010
New Toys....
Against the day that I might actually have to sail the thing, I've started accumulating various bits and pieces that I'll eventually need.
I picked up a marine compass a while back, and a last week I came across this http://www.opticron.co.uk/Pages/trailfinder_ii.htm
Note the Inter Pupillary Distance. 58~77mm. For those who can't get a one size fits all baseball hat to fit, the normal ~72 mm IPD on binoculars leaves you with a very cumbersome monocular, with a spare attached.
Many of the other Binocs with a large IPD were Lecia or Swaroski or Steiner, and the prices were quite exotic.
If you are to look through both eyes at the same time, these may be worth a look, so to say.
The are (to my unpractised eye), pretty good, solid, the focus mechanism is reassuringly free of play, and they have a 5 year guarantee.
I don't have any real experience with Optics, so someone more knowledgeable may pour scorn on my advice, but two eyes able to see at the same time is a huge improvement.
I would have preferred the traditional 7x50, but they were ~74mm IPD, and I could not try them out locally.
Tuesday, January 12, 2010
Snow ?
This is Ireland, we get 3 or 4 flakes of snow each year. That's it. Unless you are up the "mountains" (hills) and you might get enough to make a very short snowman.
This year we had several inches, and real cold. Not the 2 Celsius (35 F) that we usually get, we were getting -10 Celsius (14 F).
I took my 3 year old out on a sleigh. She loved it till she got cold.
People's pipes froze, and burst. Lakes froze over. Some people I work with took 5 hours to get home.
All this means that I have done very little on the boat since I took the pictures.
I've sharpened a few hand tools, and read a lot, but real no progress.
Subscribe to:
Posts (Atom)

